
Do I Need to Replace My Motor or Rewind it?
Is your motor starting to show signs of decreased efficiency? Have you looked at purchasing a new motor and been shocked at the cost? Maybe you should consider having your old motor rewound by an EASA accredited motor shop. Having your motor rewound is only about 40% of the cost of purchasing a brand new motor. In addition to saving money, choosing to rewind your motor can also help the environment. The rewind process has a very minimal environmental impact when compared to the carbon costs of creating a brand new motor.
When to Rewind vs Replace:
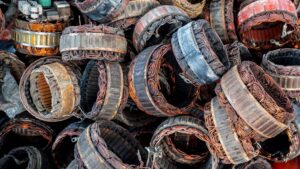
Signs you should REWIND:
- You can see signs of deterioration including burns, broken parts, moisture, or rust.
- Laminations are NOT damaged.
- Decrease in winding resistance. (This signifies shorted coils in the motor.)
- Problems with insulation resistance.
- Your motor is less than 12-15 years old.
Signs you should REPLACE:
- The magnetic core is NOT in good condition.
- Your motor is MORE than a decade old.
- Your motor was improperly rewound prior to this rewind.
- Your motor is damaged in irreparable ways.
- Bearing failure has occurred, leading to the armature grinding against the stator and causing irreparable damage.
When deciding if you should rewind or replace your motor, you need to take into account the savings you may accrue if you replace your old motor with a more energy efficient one. In order to calculate these possible savings follow this formula, applying it to both your old motor and the motor you are considering replacing it with and compare the outcome (Assumes 100% load).


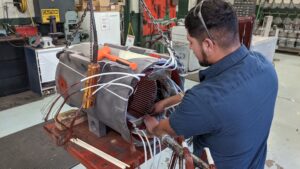
Our Shop’s Rewind Process
Our shop adheres to rigorous EASA standards and processes to make sure that your rewind is done correctly and efficiently. Our process is outlined below.
- Incoming stator core measurements are taken.
- Data is entered into our core-loss software and the measurements are converted into core steel weight.
- The core test is performed and pre-burn data is recorded.
- Opposite connection end turns are cut. (Random wound)
- A hole is drilled into the copper to add a burn oven temperature RTD.
- The stator is installed in temperature-controlled burn oven for 14+ hours depending on physical size.
- The temperature is recorded and monitored electronically to be sure that part temperature does not exceed 700o Fahrenheit.
- Once the burn cycle is complete, the part normalized to room temperature before removing to ensure the part does not warp or crack.
- After stator removal from the oven, winding data is taken from the unit and verified or redesigned through EASA verification 4.0 database.
- The wiring is carefully removed as to not splay the iron teeth.
- After winding removal, the core is blasted using walnut shell. This ensures the laminations are not rolled over and short against one another.
- After the stator is cleaned a post core test is performed.
- The core must have changed less than 20% and the watts/lb. should have a maximum of 4 to qualify for EASA accreditation and the Green Motors incentive program for maintaining motor efficiency.
- Once the stator passes the post core test and hot spot check, it is prepped for the installation of our class H insulation system.
- On a random wound machine, the circular mills per amp are calculated based upon design and slot fill.
- The wire in hand is then pulled and the automated coil machine is set up for the correct dimensions to make coils.
- A test coil is made and adjustments are made, if needed.
- The coils are then made and stacked on a coil tree for installation.
- The technician installs the coils and insulation.
- Once the coils are installed, the winding connection is then laid out and double checked.
- The leads and connection are welded and then insulated.
- The coil end turns are shaped and tied.
- The housings are then checked to be sure of proper fit, and that they will clear the new winding.
- The stator is pre heated to 325o Fahrenheit for four hours to remove moisture and wax/oil from the wire that is used during the wire manufacturing process.
- After the pre-heat, the stator is cooled to 150o Fahrenheit and lowered into the vacuum pressure impregnation system.
- From here it will go through the VPI process where the polyester resin CC-1305 will be introduced to the green winding and fill all air voids within the winding.
- It will then be re-baked for a minimum of 8 hours at 325o Fahrenheit.
- Depending on the size and voltage of the stator, it can have as many as 3 cycles.
- After the final VPI and bake process is complete and the stator has cooled to ambient temperature, the final electrical tests will be performed.
- All electrical components are tested to ANSI/EASA AR100-2015 standards.
- After testing is complete, excess varnish is removed and the mounting points will be drilled and tapped. The bore will be ground and then the stator is ready for the assembly process.
Was My Rewind Done Correctly?
Choosing a quality motor repair facility is the best way of ensuring the job was done correctly. Regardless of the shop, in order to verify that the motor rewind was done correctly, your motor shop should perform a few tests. Some will be done before the rewind takes place, and then done again after the rewind to assure losses have not occurred, and some will be done only after the rewind has occurs. A few examples of some of the tests that may be done are:
- Before and after burnout core tests. An increase of more than 20% should be cause for concern.
- Resistance measurements will verify any changes in copper losses.
- Rotor losses should remain unchanged, unless the rotor was damaged during the failure, or the diameter was changed by machining.
Got Questions About Motors or Motor Services? We Can Help!
Call 800-595-5315 Or Connect With Our Expert Technicians Here:
Other Articles
- Critical Spare Planning

- The Three Most Common Externally Caused Motor Failures
- Remedies For Common Motor Winding Failures
Lead Generator Technician
Graduated from Idaho State University with a degree in Heavy Duty Diesel and Onsite Power Generation. Damien is a master tinkerer and has been working on anything with a motor since he was about six years old. Besides being a generator fanatic, Damien is also an avid snowmobiler and aspiring world traveler.


